Eco-printing with silk

This year I decided to try out some small silk scarves for eco-printing. Last year we had some great results from dried hibiscus (the kind you can buy in bulk for tea), so we used dried hibiscus, fresh marigolds, dahlias and dried dyer's chamomile. The marigolds and hibiscus made some great marks!  For the basics, see this previous post. 
I let them unwrap them the same day this year, which is good for the instant feedback, but the results are definitely better the longer you leave them in the hot water. And letting the whole thing dry on the stick/pvc pipe is great (but not neccesary).


Before: to prepare the scarves with alum sulfate I weighed them, measured out 10% of their weight in alum, dissolved it in a pot of hot water and gently simmered the scarves in the pot for at least 15 minutes before rinsing them out. If you are using cotton be sure and boil them for an hour or so, and if you can let them cool in the pot that's even better. The rinse is important- don't skip it!

Dyeing with fresh indigo leaves


Polygonum Tinctorium
Over the summer our first graders became second graders, and the baby indigo they planted grew to become beautiful mature plants!

So on one of our first days back I took the second graders to the garden to harvest. Apparently the dye is stronger before they start to flower, so I asked the kids to try and only take stems with no flowers when possible.

We brought a pail back, which I stripped into our trusty blender. I put a few ice cubes in the bottom and more on the top, along with just a little cold water. We then blended this up for as long as we could stand it. I then poured their "indigo smoothie" through cheesecloth set over a strainer to filter out the little leaf bits. The students worked on another project at their tables while this was happening, occasionally taking a break to come help with or observe.


I don't have great pictures of the next bit because I was too busy with my hands in the indigo, but each table was given a pre-prepared skein of yarn that had been mordanted, rinsed and then soaked in plain water before class. The skeins were tied up with some cotton thread to keep them from tangling, and to provide a "handle". I gave the first kid alphabetically at each table the handle for their skein, and then showed them how to lower the yarn into the indigo bath gently and push down any errant bits with their other hand. They petted it gently for a minute, and then slowly pulled the skein back out. I helped them wring out the extra liquid, and then they swung the skein in the sink for another minute to aerate the yarn before passing the handle to the next kid. Once all of the kids at a table had dipped the same skein into the bath (each dip making the yarn a little darker) they put them into a bowl. I hung them over the sink for the rest of class, and then rinsed them out and hung them up to dry. The children watched as their yarn turned slowly from bright green to a pale aqua color! Every class had a slightly different color, and once they were done I put a few additional skeins into some of the leftover indigo bath and left them over the weekend in the refrigerator, which produced a much greener color even after rinsing and drying thoroughly. The students are now proudly weaving little pouches with all the yarn we have made over the years! 


Presenting in New York

So yesterday I shared some of what we had done with art teachers from around the country at the National Art Educators conference. It was so much fun to see the enthusiasm from so many of my peers- I am hopeful that soon I will hear about other people's fun experiments! In the meantime, here is the prezi I used while I was demonstrating and talking about our journey.

So many books....

Let's face it- there are so many great resources out there these days it can be a lot of work sorting through it all! Here are a few books that I really like. This is only a small sample of my library of reference books, but they are a good start.  The Organic Artist in particular is an incredible resource.


Making paint with plants

Paint is basically color in a liquid solution that has something to help it stick to the paper/painting surface. Ink is more like a stain and may not need the sticky factor. To play it safe with children (and avoid allergens like egg) we keep it simple and use gum arabic, honey or nothing at all.

Every year the second graders use plant paints in addition to earth pigments (from rocks) to paint portraits of people who have changed the world. Our fourth grade uses plant paints for plant studies, the sixth grade makes inks to create value studies and the seventh grade makes watercolors to use during an intensive week spent in Joshua Tree National Park.


In order to get a good range of colors (and to give kids a chance to think about different places that colors can come from) I use plants from the garden, foodstuffs from the kitchen and rocks from California with the second grade.


The kitchen and garden colors made from plants have a lot of overlap: leaves or flowers can be soaked and/or boiled to create color in water. Colors can sometimes be strengthened or altered using salt, vinegar, baking soda or alum- it's always worth it to check. 

I also use instant coffee mixed with a little water for brown, and turmeric to make an incredible yellow. This year I found a brand of beet juice that stayed super pink when dried! Experiment, keep good records and take pictures, as some of the colors fade over time. 

Red cabbage is particularly fascinating to use. I have found that if you can use the darkest exterior leaves you can get a really blue color- I only cut up one or two leaves and bring them to a quick boil. Sometimes with interior or old leaves the color is washed out lavendar. The best part about cabbage is that it is a dramatic acid indicator, turning bright pink with vinegar! Once dry it reverts to a blueish shade. 
Use an eyedropper of vinegar for drama


Making paper

A workshop with paper artist Michelle Wilson changed my view of what paper is and what it can be. Wilson creates paper in many different ways using both the familiar (recycled paper, cotton...etc) and the unfamiliar (vegetables, weeds...etc). All paper is made from plant fibers, and Michelle showed us how to process a variety of plants.

Armed with this knowledge I decided to have the first graders make paper covers for the poetry books they write in their classroom. We started by shredding white scrap paper that was heading to the recycling bin and soaking it in water. Handfuls of this go into a blender with plenty of water and are blended until you see fibers floating in solution- if it just looks chunky it might not have absorbed the water yet, or might just need more blending. Make sure it isn't too thick or you will burn out your motor!
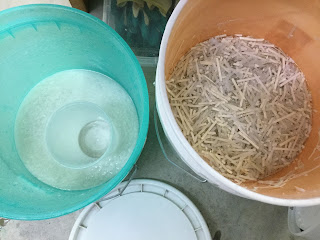


In order to emphasize that paper is made out of plant fibers I use celery as a part of the paper we use. The day before class I cut up several bunches of celery into 1" slices and boiled them in water until they mushed when pressed against the side of the pot- usually a couple of hours. I then let this cool overnight. The next morning I start rinsing them in a colander until the water runs completely clear. This is a super important step, as you are rinsing out the parts of the vegetable that will grow mold in your paper.

Young students often have the misconception that paper is made by shaving trees very thin, so I use the long stringy fibers of the celery as an example of the kind of fibers that trees have, and talk about how trees are ground down and processed, kind of like how I cook the celery. I then mush a little of the celery between my fingers so they can see that it turns into a kind of pulp.

When I demonstrate making paper I mush up and mix in some celery, and I give them the chance to do the same if they wish. I use Arnold Grummer pour handmolds, which work well. Here is a pdf of my instructions.

There are a few options for drying out your new paper:

If you don't mind it being warped you can just dry it on a drying rack.

If you want it flatter and don't want a lot of work you can press the blotted paper onto a non-porous surface and let it dry for a couple of days before peeling it off.


I use exchange drying (like blotting), which presses both sides and doesn't risk sticking and tearing. After class I swap out couch sheets a couple of times before placing the large stack into a book press. I continue to swap out couch sheets many times- 2-3 times the first day, 2 the next and so on. If you let them sit too long wet they can stick or get funky, so don't neglect them and make sure you have plenty of extra couch sheets- even though you can dry and reuse them they don't dry instantly, so you will be happy you have them.


Botanical textile impressions (aka eco-printing)

I had read about this technique, but taking a class from Kristine Vejar at A Verb for Keeping Warm filled in a lot of missing information for me. Armed with my recent experiences (and a copy of The Modern Natural Dyer) I decided to try it out with my first graders.
Although protein fibers like silk or wool take color better, I used these cotton bandanas that come by the dozen, are pre-hemmed and aren't too expensive.

The mordant stage is key to getting good prints. I accidentally gave 10 kids unmordanted bandanas, and although we did get some color none of those kids had a single leaf print, so I subsequently mordanted theirs and gave them a second chance. The results were night and day! Before they came to class I wrote each child's name on a bandana and soaked them in a little water.

We started by talking a little about what they remembered about the plants on our campus, and I announced that we were going to do an experiment to see if we could get leaves or flowers to leave a print on fabric. We went and gathered some leaves, and I supplemented with some fresh and dried flowers.

The students started by arranging their plant materials on half of their wrung out bandana. They then folded the extra material over and rolled it onto something round, like an old rolling pin or a piece of pvc pipe. Rubber bands or tight string binds the material- make sure the name tags are exposed for later identification! I had the kids put them on a tray so I could check and make sure they were well attached before putting them in a pot of hot water.

I boiled and then simmered these bundles for at least a couple of hours- more time yields better prints- and then let them cool overnight. You could unwrap them immediately, as long as they are cool enough, but the heat really sinks in. After draining off the extra water I placed these on wire shelves separated a little to discourage mold.

Unwrap and enjoy! We would like to add some sewn embellishments with dyed yarn or string if we can find the time.